For Kitchen & Prep Faucets:
- Pull out the rubber button (part #1).
- Use a hex wrench to unscrew counter-clockwise to loosen the set screw (part #2).
The hex wrench is 2.5 mm or 1/8". - Pull out the on/off handle.
If still hard to be pulled away, then loosen the set screw again.
For Lavatory & Roman Tub Faucets: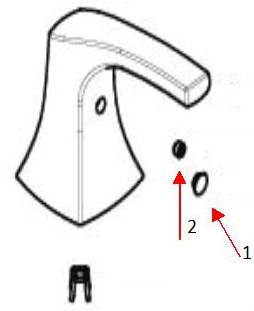
- Pull out the rubber button (part #1).
- Use a hex wrench to unscrew counter-clockwise to loosen the set screw (part #2).
The hex wrench is 2.5 mm or 1/8". - Pull out the on/off handle.
If still hard to be pulled away, then loosen the set screw again.
For Showers:
- Pull out the rubber button (part #1).
- Use a hex wrench to unscrew counter-clockwise to loosen the set screw (part #2).
The hex wrench is 2.5 mm or 1/8". - Pull out the on/off handle.
If still hard to be pulled away, then loosen the set screw again.
For Diverter Handle on Escutcheon Plate:
- The diverter handle is secured to the escutcheon plate with a C-clip. To remove it, you will need to remove the volume control handle, the handle trim ring and the escutcheon plate from the shower valve first.
- Once removed, use two small, flat-bladed screwdrivers to aid in the removal of the C-clip.
- On the back of the escutcheon, use one screwdriver blade at one end of the C-clip to keep it from turning and use the other screwdriver blade to push the C-clip end down and out of the groove.
- With the C-clip removed, be careful to retain the rubber O-ring and metal washer which were under the C-clip.
- Remove the diverter handle and retain the small black plastic washer which is found on the handle.
For 1/2" Diverter Valve or 3/4" Volume Control Valve:
- Remove the plug and loosen the set screw (part #5) by unscrewing it counter-clockwise with a hex wrench (2.5 mm or 1/8").
- Gently pull the handle assembly (part #1) out to reveal the handle extension sleeve (part #2).
- Unscrew the handle extension sleeve (part #2) counter-clockwise to remove it from the handle adapter assembly (part #3).
- Use an adjustable wrench to grab onto the flat on each side of the handle adapter assembly (part #3) and unscrew it counter-clockwise to remove it.
- Remove the escutcheon plate (part #4) to reach the rough-in valve.
NOTE: When replacing with a new handle assembly, the handle extension sleeve (part #2) is pre-installed to the handle assembly (part #1). Follow steps 1 and 2 above to remove the handle extension sleeve (part #2).
Comments
0 comments